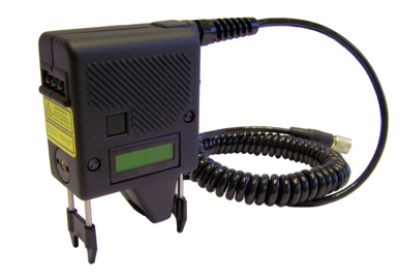
The HS610 sensor has uniquely designed optics that makes it ideal for use in measuring outside and inside radii on stamped and machined parts and for inspecting butt welds. It is also well suited for inspecting shallow surface features such as dents and gouges and other foreign object damage.
The sensor has all of the functionality of the other controller based sensors, but is lightweight and has a compact design.
Design – Without the handle of the HS305 sensor, the HS610 can fit into tighter areas. Based on the application, the cable strain relief can be positioned during manufacturing either horizontal to the inspection surface (as shown in the photo above) or vertical out of the top of the sensor. Ridges molded into the both sides of the sensor help to keep the sensor securely gripped.
Trigger – Low-tactile trigger buttons are located on either side of the sensor. Either button can be used as the trigger, depending on the preference of the operator.
Operator Feedback – Three LED's at the front and the rear of the sensor provide direction to the operator for the roll orientation so that the sensor is held at the optimum angle to the surface for scanning the feature of interest. A 2 x 16 text LCD is used to display messages, alerting the operator of scanning errors, indicating when a good scan has been completed, showing the measurement value returned and providing instructions on where the next measurement is to be taken.
Removable Standoffs – Standoffs are used only to position the sensor above the surface at an optimum distance and to guide the sensor to the center of the feature being measured. They are not a factor in the calculations made. Standoffs are designed to the requirements of the application and can be changed by the operator when required by a different application.
Automatic Gain Adjustment – The sensor's microcontroller automatically adjusts the optics to optimize the sensor’s performance on the various surface finishes, from raw metal to the full spectrum of painted colors. The adjustment is done each time the trigger is pulled, so the sensor can be moved from part to part and the scans will always be optimal.
Mounting Options – The sensor housing offers two threaded holes on the front and two on the rear of the sensor for use in mounting the sensor to a fixture.
Stability – The sensor is held from the top and the operator guides it downward until the standoffs come to rest in the desired position. As with the HS602 sensor, the operator is more likely to hold the sensor steady during the scanning process because of the size of the sensor and because holding pressure is exerted downward.
Reflectivity – The sensor is designed to minimize the reflections that can occur when the laser is aimed at an inside radius or on the edges of a weld.